Tuesday 20 November 2012

The Highlights

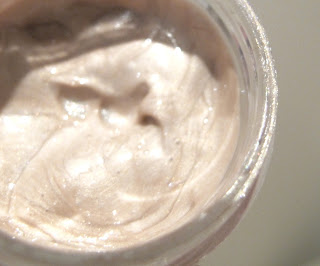
I love my MAC Strobe Cream.  It can be applied under foundation or even just on it's own to bare skin for a pretty, fresh-faced sheen.  It's also great for highlighting cheek bones, brow bones, nose and cupid's bow.  It's even full of antioxidants and very moisturising so great for your skin too!  

I'm also a big fan of Benefit's Sun Beam, a gorgeous, gold highlighting cream and am somewhat obsessed with Illamasqua's Gleam in Aurora which is a beautiful, warm, champagne coloured highlighter.  But, having already shelled out over £40 on my Strobe and Sun Beam (Mac Strobe is £22.50 and Benefit Sun Beam is  £18.50) I don't think I can justify purchasing another highlighter just yet.  So, I decided to mix my own...  

Though I love Strobe, the white cream with pink iridescent shimmer is quite cool so I thought I'd try mixing in a little of my gold highlight to add some warmth and make the overall effect a little more subtle and I'm really happy with the results:  the gorgeous, moisturising texture and goodness of Strobe with added warmth.  I still love Strobe and Sun Beam of course but now have a new one to play with too, yay!


Here you can see Strobe Cream across the top of my hand and ring finger and below it my new custom version.  


Sunday 18 November 2012

A couple more pictures of Perdy's natural make-up look...


I got the chance to make-over my little sis, Perdy today - such a pretty lady!  She doesn't tend to wear much make-up generally though she's partial to a bold lipstick on a night out.

We decided on a very natural look and I have to say she (below, holding my daughter Molly) looked STUNNING!!


After applying a matte primer and Illamasqua's Skin Base foundation, I enhanced her slightly hooded lids by brushing Mac's 'Brule' shadow all over the eye area up to the brows, followed by Mac's 'Malt' over her lids.  An extra sweep of 'Shroom' highlighting shadow (Mac) to the inner corners really opens up Perdy's eyes and makes them pop!
I finished off the eyes by enhancing her perfect almond shape with Mac's Teddy eye pencil along the top lashes and the lower outer third and Max Factor's 2000 Calorie mascara.


I contoured with Illamasqua's Cream Foundation (320 - a great contouring product), applied their cream blush to her cheeks and highlighted Perdy's cheekbones, bridge of the nose and brow bone with my custom blend highlighting cream and kept her lips natural with lip balm and a little of the cream blush for a hint of colour.  To finished off I added a sweep of Benefit Sugarbomb to Perdy's cheeks, picking out the apricot colour and set the base with Mac's Invisible Powder.

I pop of bright lippy would take this look from day to night in a jiffy!


Friday 16 November 2012

Blimey, how time flies when you're a professional make-up artist!

Yes that's right folks, I passed my course and am now an MUA - hell yeah!  Need to get loads of practice in before I head out into the world making up the great British public though so if you're in the Croydon area and fancy a free make-over look me up!

The entire course was such a journey for me.  I made some great friends and learnt SO much!  Not just about application but products, brands, loads of phenomenal artists and photographers and about the industry in general.


I had a fabulous time, though I had a couple of tearful wobbles along the way.  I struggled mostly with timing annoyingly, as we were always given time limits but this meant a lot of the time I didn't get to finish the make-up, hence why I want to practice-practice-practice before launching myself professionally.

Here are a few more of my favourite pics from the course and a couple since.  If you have any questions about the products used, feel free to get in touch. 

Pigment day!  On this day Aga did a great tutorial in the AM, showing us a natural look on one side of Festina's gorgeous face and an explosion of colourful pigments on the other.  

She looked so awesome, and got a few stares on her lunch break too!  We then had a go with the pigments ourselves in the afternoon and at the bottom you'll see my look on Maria-Carmen.  I ran out of time (as usual) but I think she looked great.


How cool are the below images?!  Nicci wanted to show us two different glowing skin applications.  If you click into the images you'll see how gorgeous Maira (top pic) & Hannah's (bottom pic) skin looks.


Below are a few more of my favourite looks that I created on the  course though I never managed to get round to finishing Hannah's (top and bottom) looks.  Both obviously need some blush and mascara but I think the colours look really pretty on her.


Some practice on my sisters before our photoshoot day.  Clio (on the left) was made up with a fresh, dewy application for my beauty look and Perdy (on the right) got the fashion look.  Finally i managed to get the looks done in the 45mins, hurrah!


And here are a couple looks I've done since the course.  Mostly i've been concentrating on perfecting my eyeliner technique (please excuse my dark circles, I didn't bother with a base but probably should have!).  There is also a pretty, green smokey eye look and Manuela was my model for the orange lips which i think look perfect on her warm, Italian skin.


Friday 19 October 2012

Today was all lips, lips, lips!  Nicci showed us a range of applications and effects and taught us about facial symmetry.

When you really study your face, it's amazing how asymmetrical we all are but much of it can be corrected with make up.  Lip work is especially time consuming as they need to look perfectly symmetrical with even colour all over and no colour bleeding.

Nicci did some amazing lips for us, a few of which are below...


Above left is me wearing a very editorial look (which would look a thousand times better on a proper model) and Emannuel with a classic red lip.


Above is Maira wearing a dark berry shade covered with pigment and gloss.

And here is Hannah with a blue glittery lip.  Love this one!

Back in tomorrow with Aga Borowa as our tutor again.  Yay!

Thursday 18 October 2012

Today our tutor was the fabulous Aga Borowa, bridal makeup expert and artist to the stars!

We covered base, blusher techniques, false lashes and eye liner.  So much to cover, our lessons could go on all night!

I had the pleasure of working with Festina in the afternoon, who has lovely dark skin.  We made each other up with a dewy base and eyeliner.  We were supposed to add false lashes but I didn't manage to get to them - I must work on my time management.
We both chose to use Illamasqua's Skin Base foundation - it's great to work with and can give a dewy/matte finish.  It looked lovely on Festina's skin and we were both happy with the end result though of course we have a long way to go.

Here is a pic of Festina, I must remember to take before pics as well as afters...


I couldn't post last night as I had such a bad day and left class feeling frustrated after failing miserably at creating a smokey eye - something i do all the time!  I decided to use cream products instead of powder, which I'm more used to and it was a disaster.  No pics of that one.  Oh, damn my conscience - I did say I'd upload the good, the bad and the ugly (referring to the make up and not the gorgeous model, Lucy, obviously).

I overloaded the eye with too much cream base and then layered with powder shadow.  It didn't work as there was so much cream it just kept creasing, eurgh!  I also got the shape all wrong and didn't manage to finish.  Not my best work but the base was good - Skin Base again.


Right, homework done and brushes cleaned.  We're working on lips tomorrow.  Apparently they're one of the hardest things to master.

Tuesday 16 October 2012

Second day on my make up course and we covered A LOT! 

Today was all about creating the perfect base.  Tutor Nicci Jackson took us through skin tones which, so far I'm finding very confusing (warm, cool, pink, yellow...) so fingers crossed it will click into place soon!  Most people in the class are warm and I always thought I was cool but apparently I'm warm and cool in places.  

Nicci made up two girls from the class, Lucy & Maria, who both have very different skin tones and needs so it was great to see.  Who knew that orange beard cover up (as in 5 O'clock shadow!) was so great at covering dark circles? 

Nicci also took us through primers, the differences between some of the best foundations on the market and introduced us to Derma Palettes - which we got very excited about!

Our practical task was to pick a partner to make up, choose their correct foundation tone & shade and apply it perfectly within 15mins.  
I paired up with beautiful, Brazilian Myra and we got to work.  Once time was up we were taken outside to the natural light where Nicci examined our work.  Myrna & I did pretty well, no glaring errors and we chose the perfect shades thankfully.


Next we used the Derma Palettes (yay!) to conceal imperfections, though, honestly Myrna barely had any - not even dark circles!  Amazingly though, you can spend forever concealing and we had to be stopped and taken to the harsher, artificial, fill light to be checked over again.  I think we both look pretty gorgeous and we passed the task.


Tomorrow we continue learning about skin tones, contouring, highlighting and start to look at eye shadows & liners.  Phew!

Monday 15 October 2012

Finally started my makeup course at London Muse today and so far so great.

It's an intensive Foundation/Advance course over two weeks with the last day being a photo shoot, yay!!

We started off learning about hygiene (very important), etiquette, brushes, skin preparation and facial geometry.  Phew!  So much to take in but we'll keep going over the important bits so that by the end of the two weeks we'll be pros hopefully.

The afternoons are all practical and our first foray into professional makeup artistry was to draw perfectly symmetrical squares on each others faces.  Not as easy as it sounds.

Here's me and the lovely Hannah showing off our handy work.


We failed!  Drawing straight lines with a makeup brush on someone's face is not easy but it was fun trying.

Looking forward to tomorrow...


Thursday 4 October 2012

My name is Semley Wilkinson and I'm a Makeup-aholic. 


There, I've said it.

I own so much makeup that I often forget I own products and buy them again -  though don't tell my husband.  It's an expensive addiction and there's a lot that goes to waste as I go through phases of wearing lipsticks, thick eyeliner, smudgy eyeliner, glittery eyeliner, fake tan, no tan... not all at once obviously.

I go all-out and over-spend for every obsession, purchasing alternate colours, types, brands.  A girl needs options, right?  I'm an advertiser's dream.


But now I'm going pro and I'm guessing I'll be buying an entire kit (MAC, here i come!!!), so is my existing collection going to go to waste?

Monday 1 October 2012

My wedding seems like ages ago now but I still love to look at the pictures and think, a) how much i love my husband and what a wonderful day it was and, b) how much i love my make up!

I decided from the outset that i would do my own bridal make up, not just because i love doing it but also, whenever anyone else does I feel like i look like a clown or they just didn't get what i wanted.

One time i made the mistake of having a makeover on my lunch break at a beauty counter in a large department store in Central London.  What was i thinking?!  When i looked in the mirror at the end i almost burst into fits of laughter, i looked like i was about to run away with the circus and spent the next hour subtly rubbing it all off as i sat greeting clients on a busy reception desk.
I also thought, mistakenly, that i would save loads of money but I spent hundreds and hundreds of dollars (we were living in the states at the time) on different types primers, brushes, foundations, concealers, cream shadows, powdered shadows...

I have a great collection of, well everything now though so it was worth all the money and i had great  fun trying it all out.  I wanted a classic, natural look to enhance my skin and features.  It had to stay put all day (not easy when your wedding is in high summer and you have an oily T zone) and look great in pictures.

Since i was a complete novice i came across Debbie Jean on the internet a few months prior to the wedding and signed up for her online make up tutorial.  I'm so glad i did!  She gave me lots of advice on colour pallets, the best brands for my needs and how and where to apply the products.
It was the best £25 i spent of the entire wedding budget.  I even got a mention on her blog - http://make-upmiracles.blogspot.co.uk/.

Anyway, enough of my waffling.  Here are a few pics that show my make up from the wedding:


Aha, my first post... ever!

I've started this blog, primarily, to share my love of make up and document my training from novice to pro via the course i'm super excited to be starting in mid October at London Muse school of make up.

I'll regularly update the blog with images from the course - the good, the bad and the (hopefully not too) ugly and in the meantime i'll share some projects i've worked on in the past along with other inspirational images (i have many) and product reviews.


First up, here is a pic of my gorgeous sister Clio.  She had an oscars style party this past weekend and was wearing a full length teal coloured dress from Reiss.  I immediately pictured either a smokey or gold eye so trawled the internet and my wealth of magazines (i have too many) and books for inspiration.  I chose to base the look on an image i found in the Rae Morris Make Up 'The Ultimate Guide' and we were both really happy with the result.  Or at least Clio said she was, i am still waiting for an image of her with her hair up and dress on so maybe she scraped it off as soon as she left my house.

There is definitely plenty of room for improvement but i love it and can't wait for my next assignment!